Top 8 Best Stereo Miking Techniques (With Recommended Mics)

“Get it right at the source” is a popular and important mantra that rings throughout the recording industry. Stereo miking techniques allow us to capture true stereo audio at the source and sounds more authentic than multi-tracking multiple mono signals. So how do we best set up microphones for stereo recording?
If you'd like to support my work and learn more about music production, please consider subscribing to my Substack.
The Top 8 Best Stereo Miking Techniques:
- X-Y
- Blumlein Pair
- Mid-Side
- ORTF Pair
- Olsen Wing
- Binaural Stereo With Artificial Head
- AB Technique
- Decca Tree
In this article, we'll dive into each of these excellent stereo miking techniques with greater detail.
Why Use Stereo Miking Techniques?
The main argument for stereo is that humans naturally hear in “stereo.” We have a left ear and a right ear and distinguish all audible information from our two ears.
Stereo miking techniques (especially the baffled near-coincident pairs) approximate the way we hear naturally.
On top of this, nearly all music recorded today is in stereo, and most visual media will at least have a stereo mix (if it's not their only mix).
Using stereo miking techniques captures a true stereo sound from the start. This often sounds much more natural and full when compared to multi-tracking and panning multiple mono mic signals.
For more info on mono and stereo audio, check out my article Is Stereo Or Mono Audio Better? (Applications For Both).
Now let's get into the top 8 best stereo miking techniques, one by one!
1. X-Y
The X-Y setup is a coincident pair miking technique that utilizes a pair of directional (cardioid-type) microphones.
X-Y is ideal for close-miking and less ideal for distant/room-miking applications. It provides a narrow but clear stereo image.
The two-directional microphones are positioned with their capsules as close together as possible (coincident pair) and at an angle between 90° and 135° from one another. Typically, the polar pattern axes of the microphones are parallel to the floor/horizontal.

Though X-Y stereo miking techniques most commonly use top-address “pencil” microphones, this technique is also achievable with side-address mics. This is likely because, generally speaking, the smaller diaphragm pencil mics can be positioned closer together for a “more coincident” pair.
Because of the coincident nature of X-Y, the stereo effect is produced by the differences in sound pressure level between the two microphones. The time-of-arrival and phase differences are negligible in this coincident pair.
The above truths mean a few things about X-Y:
- Relatively weak stereo image.
- Relatively low sense of space and depth.
- Excellent phase coherence and mono summing.
How To Mic With X-Y:
It's beneficial to use a stereo bar microphone mount when positioning mics in X-Y for simplicity and stability. Start with the standard 90° between the mics and spread them out as far as 135° if a wider image is required (listening for the hole-in-the-middle effect). X-Y works best when close-miking.
Picking less directional microphones will yield a fuller sound but with less stereo imaging. Conversely, choosing more directional microphones (like hypercardioid or supercardioids) will give more of a stereo image at the expense of losing out on the full sound source. Highly directional microphones will often also suffer from the hole-in-the-middle effect, where the intended sound source ends up sounding thin and weak.
When two bidirectional (figure-8) microphones are positioned in X-Y, we get a stereo technique that resembles the Blumlein Pair, which we'll get to next!
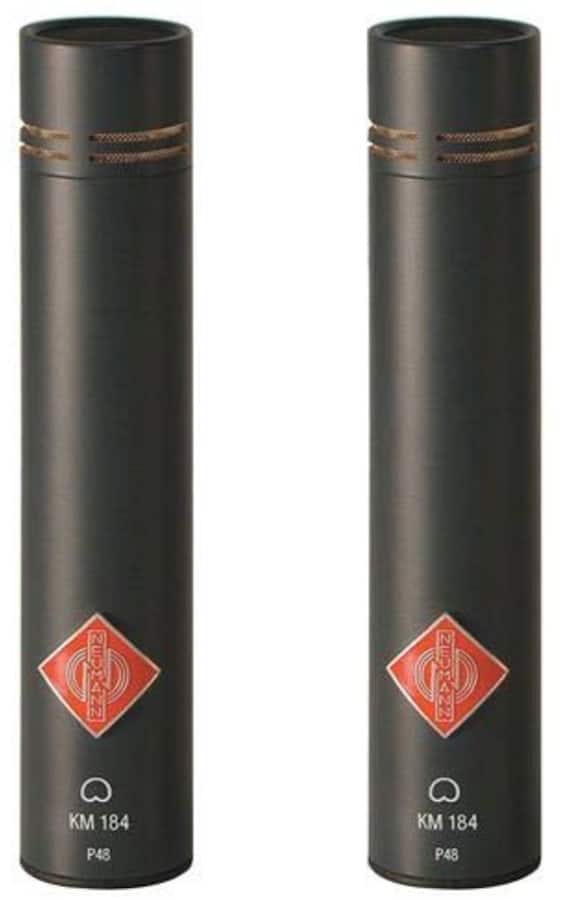
Recommended microphones: pair of Neumann KM 184s.
Neumann
Neumann is featured in My New Microphone's Top 11 Best Microphone Brands You Should Know And Use.
Click to get back to the main list.
2. Blumlein Pair
The Blumlein Pair is a coincident miking technique that utilizes a pair of bidirectional microphones.
This technique is named after its inventor, Alan Blumlein, an English electronics engineer.
As mentioned, the Blumlein Pair resembles the X-Y technique. The differences are that the Blumlein Pair mics are bidirectional (figure-8) rather than cardioid and are always positioned at 90° (the mics point ±45° from the intended sound source).
Another difference is that the Blumlein Pair microphones are always side-address due to the nature of their bidirectional patterns. For this reason, the mic diaphragms are most often stacked on top of one another to achieve the coincident positioning. The axes of the mics are parallel to the floor.
For a coincident pair, the Blumlein technique has great stereo separation. This is due to the side rejection inherent in bidirectional microphones and how the side rejection of one mic lines up with the on-axis line of the other and vice versa.
The Blumlein Pair also captures room sound excellently due to the rear sensitivity of the bidirectional patterns. As will most microphone techniques, positioning a Blumlein Pair closer to a sound source will reduce the room ambience.
The above truths mean a few things about the Blumlein Pair:
- Great stereo image considering it is a coincident pair.
- Low sense of space and depth but the potential for great ambience.
- Excellent phase coherence and mono summing.
How To Mic With The Blumlein Pair:
Because bidirectional mics are side-address, position the two mics of a Blumlein Pair with one centred just above the other. Hold each microphone in place with its own stand. Point each mic 45° to either side of the intended sound source (along the horizontal plane), so the mics point 90° from each other.
The Blumlein Pair is a beloved technique in the playbook of recording engineers for its simple setup and realistic stereo image.
Recommended microphones: pair of Royer R-121s or a single Royer SF-12.


Royer Labs
Royer Labs is featured in My New Microphone's Top 11 Best Microphone Brands You Should Know And Use.
Click to get back to the main list.
3. Mid-Side
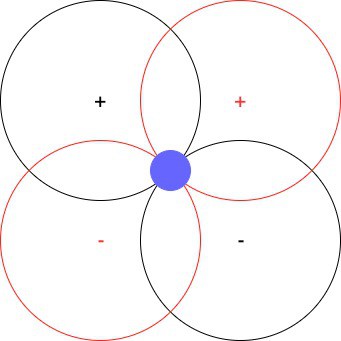
The Mid-Side technique is a coincident miking technique that utilizes one cardioid microphone and one bidirectional microphone.
The Mid-Side technique is not a “stereo pair” since it requires a cardioid and a bidirectional microphone. That being said, pairs of multi-pattern microphones often make for great Mid-Side tools.
The cardioid mic is the “Mid mic” in this technique and points toward the intended sound source. The bidirectional “Side mic” is positioned as close as possible and perpendicular to the Mid mic. This points the figure-8's null point toward the source. The resulting polar pattern of the Mid-Side technique is shown below:

Unlike the other 7 stereo miking techniques that simply pan their microphone signals to the appropriate sides, the Mid-Side technique requires further processing in the mix:
- Pan the “Mid” mic dead centre
- Duplicate the “Side” mic signal
- Pan the first “Side” mic signal hard left
- Flip the phase of the second “Side” mic signal and pan it hard right
Note that there are also Mid-Side processing plug-ins that can take care of the processing for you.
The Mid-Side technique is perfect for summing to mono. The “Side” signals yield a fairly wide stereo image in stereo. However, because the bidirectional Side mic is completely out-of-phase between the left and right channels when the Mid-Side mix is summed to mono, the Side channels cancel each other out perfectly.
Voila! No phase issues! We're left with only the Mid channel.
It's a good idea to link the two side channels together in the mixing console or DAW for easier mixing of the stereo information.
The above truths mean a few things about Mid-Side:
- Strong centre image
- Very wide stereo image
- Collapses to mono with no phase issues (the Side channels cancel out)
How To Mic Mid-Side:
Position a cardioid microphone to point at the intended/important sound source. Directly above or below (as coincident as possible), place a bidirectional microphone, so its on-axis line runs 90°/270° relative to the cardioid mic.
In the mix, pan the cardioid “Mid” mic centre. Duplicate the bidirectional “Side” mic. Pan one mid signal hard left. Pan the other hard right with its phase flipped.
Though Mid-Side is likely the most involved technique on this list, it is one of the most popular.
Recommended microphones: pair of AKG C 414s (one in bidirectional mode and the other in cardioid mode).

More on the AKG C 414s and multi-pattern microphone stereo miking here.
AKG
AKG is featured in My New Microphone's Top 11 Best Microphone Brands You Should Know And Use.
Click to get back to the main list.
4. ORTF Pair
The ORTF Pair is a near-coincident pair miking technique that utilizes two cardioid microphones.
The ORTF Pair was developed by the Office de Radiodiffusion Télévision Française (the French broadcasting company) as an improvement over the standard X-Y technique.
ORTF Pairs utilize a pair of cardioid microphones. The mic capsules are spaced 17 cm (6.7″) apart and at 110° from each other (pointing 55° to either side of the centre sound source).

Though pencil mics are common in ORTF setups, the near-coincident nature of the technique allows us to choose any pair of cardioid mics.
The main idea behind the ORTF Pair is to capture sound similar to how our ears would naturally hear sound. In other words, ORTF is designed to yield a fair stereo image without losing too much in terms of middle/centre information. This is done simply and without the need for a baffle or artificial head.
This technique works well at a distance from the sound source but excels (like the X-Y) at closer distances. The baffled techniques and AB technique are generally preferred for distant miking.
The above truths mean a few things about the ORTF Pair:
- Small loss of centre image
- Fairly wide stereo image (wider than X-Y)
- Small phase issues when summed to mono (more than X-Y)
How To Mic With An ORTF Pair:
It's beneficial to use a stereo bar microphone mount when positioning mics in ORTF for simplicity and stability. Getting the microphones in the true ORTF positions will take some adjustment, but they certainly do not need to be exact.
Start by angling the mics 110° from one another and then lock them into position with the capsules 17 cm (6.7″) apart.
For best results, use the ORTF Pair in close-miking situations.
Although a French invention, the ORTF Pair has become a staple in audio engineers' handbooks across the globe.
Recommended microphones: pair of Neumann KM 184s.
Click to get back to the main list.
5. Olson Wing
The Olsen Wing is a near-coincident baffled miking technique that utilizes a pair of omnidirectional microphones.
This technique works amazingly well for capturing a strong stereo image of outdoor ambiences. It also works well in the studio.
There are no set standard measurements for the Olsen Wing. That being said, a distance of 4″-24″ between microphones is a good place to start.

As we see in the photo below, not only are the omnidirectional pencil mics touching the baffle that separates them but they are also positioned directly against a common lower boundary. This increases the stereo separation drastically by rejecting common diffuse sounds while focusing on individual direct sounds.

Although this near-coincident baffled mic technique features two omnidirectional microphones in close proximity, it actually yields an impressive stereo image.
The obstruction to sound caused by the baffle is effective at reducing direct sounds. The direct sound from the sides or bottom of the Olsen Wing is reflected before they are able to enter the far microphone effectively.
Sounds from directly in front, behind, or atop the Olsen Wing will practically enter both microphones at the same time and in phase.
The above truths mean a few things about the Olsen Wing:
- Strong centre image
- Wide stereo image
- Small phase issues when summed to mono
How To Mic With The Olsen Wing:
Miking with the Olsen Wing requires the baffle. Due to the obscurity of this technique, you'll likely want to build your own:
• Start with a bottom plate.
• Attach a solid baffle or two individual baffles to the top of the bottom plate to separate the microphones.
• Try to make the baffle height equal the distance from the baffle ends to the ends of the bottom plate.
• Attach a microphone in each of the two 90° corners between the baffle and the bottom plate.
• Point the Olsen Wing at the intended sound source or slightly upward if capturing ambience.
The Olsen Wing is but one of the many obscure near-coincident baffled miking techniques. I thought this one to be the best to include in this list!
Recommended microphones: pair of Audio-Technica AT4022s.

Audio-Technica
Audio-Technica is featured in My New Microphone's Top 11 Best Microphone Brands You Should Know And Use.
Click to get back to the main list.
6. Binaural Stereo With Artificial Head
The Binaural Stereo technique that utilizes an artificial head is another near-coincident baffled miking technique that utilizes two omnidirectional microphones.
It is much more popular than the aforementioned Olsen Wing. There are numerous artificial heads for binaural recording on the market. One I'd recommend checking out is the Neumann KU 100 Dummy Head:

The Binaural/Artificial Head miking technique was a logical progression in microphone technology. For years prior, engineers were using miking techniques that attempted to simulate how our ears naturally heard sound (X-Y, Blumlein Pair, ORTF, and many more not included in this article).
At some point or another, the idea of sticking microphones into the ear canals of an artificial head came about. Since its inception, this clever technique has been tried all over the globe.
All you need for this miking technique is:
- A high-quality pair of tiny omnidirectional microphones (I recommend the DPA d:screet CORE 6060 lavalier mics)
- An artificial head (there are plenty of these on the market or you could make one yourself. Ensure the ears of the head are as similar as possible to human ears).
Placing the mics inside the ear canal of the artificial head gives an incredibly accurate binaural recording that translates beautifully to headphones.
Conversely, this technique may sound odd and unnatural over stereo loudspeakers, so pick your poison!
The above truths mean a few things about the Artificial Head Binaural Technique:
- Incredibly accurate for binaural recordings/headphone playback
- Decent centre image
- Fairly wide stereo image
- Some phase issues when summed to mono
- Slightly unnatural sounding when played back on spaced loudspeakers
How To Mic Binaurally With An Artificial Head:
Mount the head to face the main sound source (or however else you'd like to pick up the sound). Insert the omnidirectional lavalier microphones into the ear canals of the head.
In my opinion, of all the miking techniques on this list, the Binaural Artificial Head technique is the coolest to put into practice and listen back to in headphones.
Recommended microphones: pair of DPA d:screet CORE 6060s.

DPA
DPA is featured in My New Microphone's Top 11 Best Microphone Brands You Should Know And Use.
Click to get back to the main list.
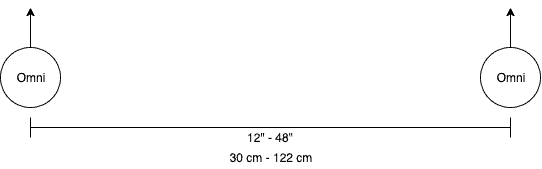
7. AB Technique
The AB Technique is a near-coincident or spaced pair miking technique (depending on the distance between the two mics) that utilizes a pair of cardioid or, alternatively, a pair of omnidirectional microphones.
AB miking is awesome for capturing wide stereo images in small and large spaces. It is one of the most popular stereo miking techniques in the world.
It's best to use two omnidirectional microphones for this technique (think room mics), though other directional patterns could do the trick at closer proximities (think drum overheads).
There is no set spacing between the A mic and B mic for the AB technique, so listen to the room and the sound sources to find the sweet spots for each microphone. Typically, though, the A and B mics are at the same height and at equal distances from the intended or critical sound source.
Because the AB Technique is an adjustable spaced pair, the stereo image can theoretically be as small or as great as the engineer decides.
The stereo image is defined by the differences between microphones A and B in sound pressure level and the sound waves' time-of-arrival (of the incident wave and the reflections). As you can imagine, the AB Technique is capable of yielding a wildly huge stereo image.
The above truths mean a few things about the AB Technique:
- Adjustably wide stereo image.
- Excellent sense of space and depth.
- Relatively poor phase coherence and mono summing.
How To Mic With the AB Technique:
First, determine the main sound source and/or the centre of the sound sources you'll be capturing with the AB technique. You'll want the two microphones to be equidistant from this centre. Next, position the microphones as symmetrical as possible (height, direction, distance from centre). Adjust the distance between mic A and B for a greater or lesser stereo image.
Many recording engineers will follow the 3:1 rule when using the AB Technique. The 3:1 rule states that the distance between microphones A and B should be 3 times the distance between the sound source and either microphone.
The 3:1 rule works to reduce the “phasiness” of off-centre sounds between microphones A and B. It works because the sound pressure of the source entering mic B will be reduced in level compared to the signal entering mic A.
A baffle may be used between the mics to further reduce phase issues and increase stereo separation with the AB Technique. The two microphones can be positioned closer together when utilizing a baffle while maintaining a solid stereo image. Depending on how close the mics become, we could get into a Jecklin Disk or Modified Schneider Disk stereo miking technique.
Recommended microphones: pair of Wunder Audio CM7 Supremas.

Click to get back to the main list.
8. Decca Tree
The Decca Tree is a stereo miking technique that utilizes three omnidirectional microphones spaced apart in an isosceles triangle. It is the only 3-microphone technique on the list.
The Decca Tree, as the name suggests, was invented by Decca Records. Since its inception in the 1950s, the Decca Tree has become a popular standard method of recording orchestras and symphonies stereo.
3 omnidirectional mics (identical mics are preferred) are needed for the Decca Tree. These mics are suspended roughly 10′ above the conductor’s head. The two rear microphones are 2 m (6.5′) apart, with the centre mic 1.5 m (5′) in front of the rear mics. Together, the 3 mics form in a triangle formation. See the following diagram:

The elevation of the Decca Tree allows for the clean capture of both direct sounds and the reflected sounds around the room. The result is a clean and musical recording.
Because of the 3-omnidirectional-microphone setup and the relatively large distance between the Decca Tree and the [typically] large mass of a sound source, the stereo image of the Decca Tree is usually full and wide.
The above truths mean a few things about the Decca Tree:
- Full and wide stereo image.
- Excellent sense of space and depth.
- Relatively poor phase coherence and mono summing.
How To Mic With the Decca Tree:
The Decca Tree requires microphones to be suspended above the sound source, so tall stands/ceiling mounts are needed. A large room is also a requirement to get the most out of the Decca Tree.
Place 3 omnidirectional mics in the triangle described above roughly 10′ above the sound source.
The Decca Tree does not only work on large orchestras and symphonies. Try it out in studio recordings of drums, chamber ensembles, choirs, bands, or even solo instruments.
The Decca Tree has inspired many stereo and surround miking techniques, including the Fukada Tree, Optimized Cardioid Triangle (OCT), and Hamasaki Square.
Recommended microphones: pair of Neumann M 50s (or Wunder Audio CM50 Suprema clones).

The Neumann M 50 has been discontinued.
Click to get back to the main list.
A Look At Stereo Miking With Multi-Pattern Microphones
Allow me to repost the featured image here:
The above photograph was taken after a choir recording I had done in a local church. It features a pair of my favourite multi-pattern microphone: the AKG C 414.
So, as we can see, there are two AKG C 414s set up in Mid-Side.
The top microphone is set to the cardioid pattern and was pointed at the choir. The bottom microphone is set to bidirectional (figure-8) perpendicular to the top microphone. You can see which pattern is selected by the figure denoted by the green lights. The two capsules are almost as close as possible without the microphones touching.
However, if I was to rotate these two microphones only 45° (with the choir staying put), I'd have access to the two other coincident pair stereo miking techniques.
- Rotating 45° and setting both mics to cardioid would yield an X-Y stereo miking pattern.
- Rotating 45° and setting both mics to bidirectional (figure-8) would yield a Blumlein Pair stereo miking pattern.
This is the magic of multi-pattern microphones when it comes to stereo miking!
Other Stereo Miking Techniques
On top of the top 8 best stereo miking techniques mentioned above, there are many others.
Here are 3 short lists covering all stereo miking techniques with links to their descriptions in my Microphone Terminology/Glossary page:
Coincident Pair
- Blumlein Pair
- XY Pair
- Mid-Side (not a true pair)
Near-Coincident Pair
- DIN Pair
- EBS Pair
- Faulkner Array
- NOS Pair
- Olsen Stereo 180 Microphone Technique
- Olson Wing
- ORTF Pair
- RAI Pair
- Stereo Ambient Sampling System
- AB Technique (sometimes)
- Jecklin Disc Technique
- Schneider Disc Technique
Spaced Pairs
Surround Sound Miking
Taking things a step beyond stereo miking leads us into miking techniques for Surround Sound.
Again, the following list of Surround Sound miking techniques links to my Microphone Terminology/Glossary page:
- Ambisonic Array (when formatted to surround sound)
- Ambisonic Microphone (when formatted to surround sound)
- Ball Boundary Technique
- Cardioid Trapezoid
- Corey/Martin Tree
- Double Mid-Side Array
- Double ORTF Array
- Fukada Tree
- Hamasaki Surround System
- INA-5
- IRT Cross
- OCT-Hamasaki
- OCT-IRT
- OCT Surround
- Omni+8 Surround
- Polyhymnia Pentagon
- Spherical Microphone Array
- Wide Cardioid Surround Array
Related Questions
What is true stereo? True stereo is a term for recording a sound in stereo with a stereo mic or stereo miking technique. The source is captured in the left and right channels at the same time. This is different than multi-tracking mono sources serially and then panning them in a stereo mix.
What is a stereo microphone? A stereo microphone is a mic that has two or more capsules that are set up in true stereo configurations and is capable of recording in stereo. Stereo mics will output two (or more) individual mono signals that are then panned to obtain the stereo image.
For more information on stereo microphones, check out my article Do Microphones Output Mono Or Stereo Signals?
Choosing the right microphone(s) for your applications and budget can be a challenging task. For this reason, I've created My New Microphone's Comprehensive Microphone Buyer's Guide. Check it out for help in determining your next microphone purchase.
Leave A Comment!
Have any thoughts, questions or concerns? I invite you to add them to the comment section at the bottom of the page! I'd love to hear your insights and inquiries and will do my best to add to the conversation. Thanks!
This article has been approved in accordance with the My New Microphone Editorial Policy.